

2.
Click Draw Layer.
The mouse pointer changes to a cross when you move it over the page.
3.
Drag a layer of any size onto the page and release the mouse button.
4.
Click the selection handle at the upper left corner of the layer to make
sure that it is selected.
5.
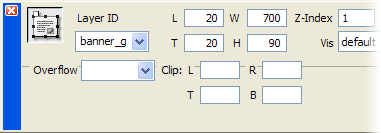
With the new layer selected, do the following in the Property inspector
(Window > Properties):
I
Click in the Layer ID text box and rename the layer
banner_graphic.
I
In the Width (W) text box, enter 700px.
I
In the Height (H) text box, enter 90px.
I
In the Left (L) text box, enter 20px.
I
In the Top (T) text box, enter 20px.
I
Press Enter (Windows) or Return (Macintosh) to apply your last
entry.
Dreamweaver sizes and positions the new banner_graphic layer. The
banner_graphic layer is 700 pixels wide by 90 pixels high. It is also
positioned 20 pixels from the left margin of the page, and 20 pixels
from the top margin of the page.
158 Tutorial: Creating a CSS based Page Layout
footer
Our partners:
PHP: Hypertext Preprocessor Best Web Hosting
Java Web Hosting
Jsp Web Hosting
Cheapest Web Hosting
Visionwebhosting.net Business web hosting division of Web
Design Plus. All rights reserved